How to Check If Your IP Address Is Blacklisted (and Get Delisted)
Run a free blacklist IP address check across 80+ DNS blocklists in minutes. Learn how to check if your IP is blacklisted and get delisted fast.
 Dig Trace Team· Network Engineering Team13 min read
Emails start vanishing into spam folders. API calls come back with 403 errors nobody can explain. A partner's firewall begins dropping your traffic without a word. All three point to the same culprit: your IP address has landed on a blacklist.
Confirmation takes minutes, not hours. A blacklist IP address checker runs your address against dozens of DNS-based blocklists at once and tells you exactly where you stand. This guide covers the full process, from picking the right IP to test through interpreting results and getting delisted. Every tool involved is free, and none of them require an account. If you've been wondering how to check if your IP is blacklisted, the five steps below take you from question to answer in one sitting.
Key Takeaways
Point | Details |
|---|---|
What the check does | Queries DNS-based blocklists (DNSBLs) that flag IPs for spam, malware, botnet activity, or proxy abuse |
Time required | Under 5 minutes with a free multi-list checker |
The list that matters most | Spamhaus ZEN, which most major mailbox providers query directly |
If you're listed | Fix the root cause first, then request delisting or wait for auto-expiry |
Cost | Free. No account, no software, no payment |
In This Article
What You'll Need
Gather three things before you start.
The IP address to test. IPv4 or IPv6 both work. If the problem is email delivery, use your mail server's address, not the machine you're sitting at.
Your domain name if you want to catch domain-based listings alongside IP ones.
A rough timeline. Knowing when the trouble started helps you match listings to causes later.
Blacklist lookups are plain DNS queries. There's nothing to install and nothing to sign up for.
Pro Tip: Not sure of your mail server's address? Run an MX lookup on your domain first. Testing your office connection when the flagged traffic comes from the mail server is the most common way these investigations go sideways.
What Is a Blacklist Check?
A blacklist check queries DNS-based blocklists, often shortened to DNSBLs or RBLs. These are live databases of IP addresses flagged for sending spam, hosting malware, participating in botnets, or otherwise misbehaving. Email providers, security firms, and firewall vendors each maintain their own lists and consult them before accepting traffic. Services like DigTrace test an address against more than 40 of these lists in a single pass.
Each list sets its own criteria and runs its own removal process, so getting off one clears you nowhere else. The stakes justify the effort. Industry estimates put legitimate email that never reaches the inbox because of blacklist entries at 15 to 20 percent, and IP reputation now shapes far more than mail. APIs, scraping frameworks, and payment platforms increasingly check reputation before they respond at all.
How to Check IP Blacklist Status in 5 Steps
The short version, for those who like the map before the terrain:
Identify the exact IP involved
Run a multi-list scan
Weigh each listing by its real-world impact
Work out why the listing happened
Fix the cause, then request delisting
Here's each step in full.
Step 1: Find the Right IP to Test
Pin down the exact address before you scan anything. Troubleshooting your own connection? An IP checker shows your public address the moment the page loads. Email trouble calls for a different target entirely, so look up your domain's MX records to find the mail server receivers actually judge. Cloud workloads add one more wrinkle, since the egress IP your traffic leaves from often differs from the IP assigned to the instance.
Why the fuss? Checking the wrong address produces a clean result that means nothing. Analysts burn entire afternoons testing a workstation IP while the mail server sits listed the whole time.
Step 2: Run a Multi-List Scan
Paste the address into a checker that queries many blocklists at once. Dig Trace's IP blacklist checker runs your IP through a broad set of DNSBL and reputation services and organizes the hits for you. IPVoid works similarly, scanning more than 80 reputation and DNSBL services in real time.
A single-list check is a coin flip. Your address can be spotless on one database and flagged on another that your biggest customer's mail server consults every morning. Broad coverage is the entire point of the exercise.
Pro Tip: Test the IPv6 address too if your server has one. Listings frequently appear on only one protocol, and plenty of servers send mail over IPv6 while the IPv4 side stays clean.
Step 3: Weigh Each Listing by Its Real Impact
Not all listings deserve the same response. A hit on an obscure database and a hit on Spamhaus are different animals entirely.
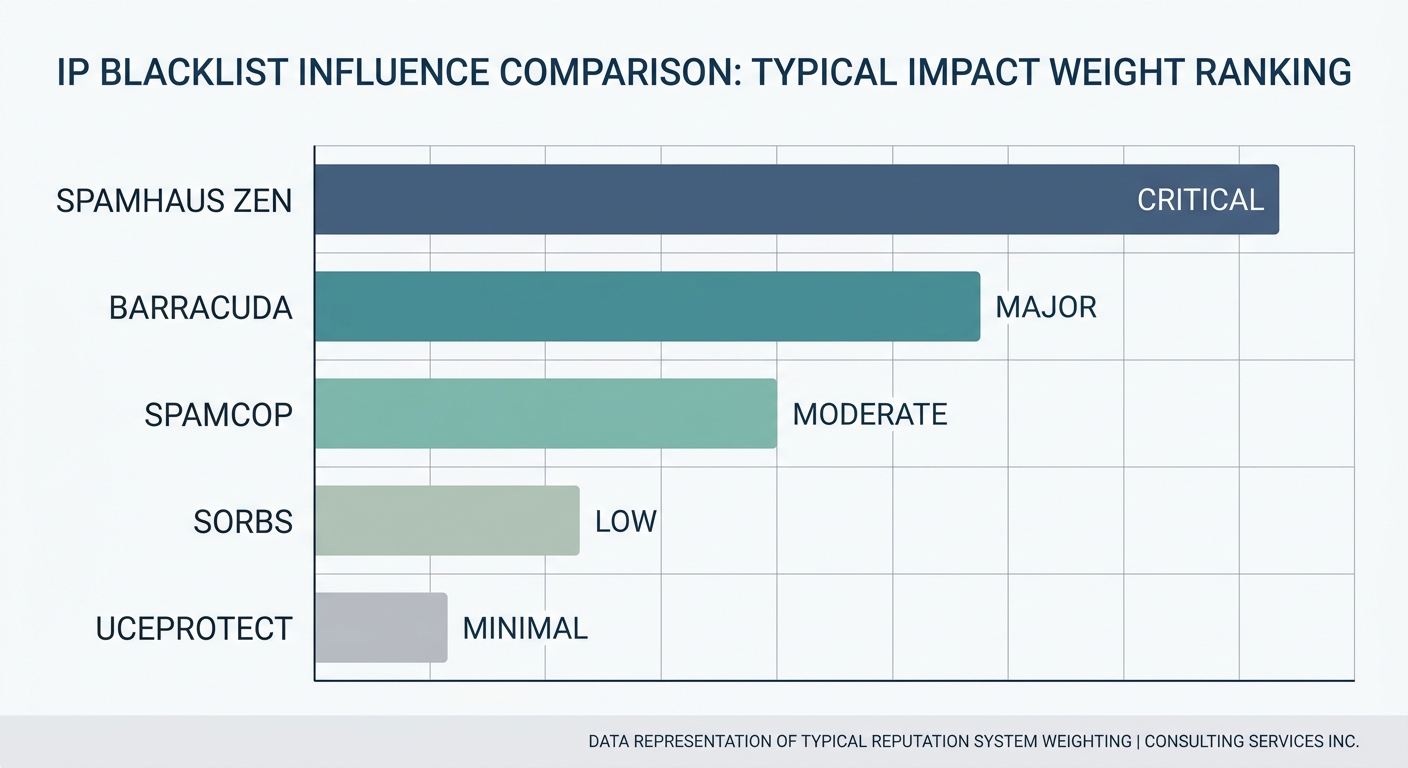
Spamhaus ZEN sits at the top. Most major mailbox providers query it directly, so a listing there means high spam-folder rates or outright rejection. Barracuda's blocklist carries serious weight with on-premises Exchange servers.
Lower down the ladder, SpamCop lists automatically on complaint volume and clears itself after roughly 24 quiet hours, which makes it a signal to watch rather than a fire to fight. SORBS and UCEPROTECT are queried by far fewer receivers, and UCEPROTECT's paid removal at higher levels has drawn criticism, so a listing there rarely explains a problem on its own.
A listing's impact depends on who queries the list, not on how alarming the dashboard looks.
The classic mistake here is panic. One critical listing justifies same-day action. Five hits on no-name databases usually deserve a note in your monitoring channel and little more.
Step 4: Identify Why You Got Listed
Location tells you severity. Cause tells you the fix. Most listings fall into one of four buckets:
Spam listings. Outbound volume spiked or complaints piled up, often after a compromised mailbox starts blasting.
Exploit listings. Something on the network is infected and pinging other servers. A hijacked IoT device can do this with no visible symptom.
Proxy and VPN listings. The address sits in a datacenter range or routes through a low-quality VPN, which banks and tier-one sites block preemptively.
Bad neighbor listings. You share a range with someone who misbehaved, and the whole block got painted.
Match the bucket against your own logs. Mail server records, firewall events, and outbound traffic graphs will usually confirm which story is yours. Skipping this step is the mistake, and it's also why so many delisting requests fail within hours.
Step 5: Fix the Cause, Then Request Delisting
Every major list publishes its own removal process. The Spamhaus reputation checker is the right starting point for its listings, and most other operators offer a similar lookup on their own sites. Submit a short, honest delist request once the underlying problem is closed. Some lists clear automatically after a quiet period, so patience is occasionally the entire strategy.
Sequence matters more than speed. Request removal before fixing the cause and you'll be back on the list fast, and repeat listings erode your standing with the operators who review future requests.
Pro Tip: Scan every device on the network for malware before you submit a delist request, routers and smart devices included. One hijacked camera can re-list a clean IP the same afternoon.
What to Expect From Your Results
Most checks land in one of three places.
Clean across the board. Blacklists probably aren't your problem. Look at email authentication records, message content, or the recipient's internal filters instead.
Listed on one or two minor databases. Note it, watch whether it recurs, and move on. These rarely explain deliverability failures by themselves.
Listed on Spamhaus or Barracuda. Act today. Close the cause, request delisting, and expect resolution within hours to a few days. Auto-expiring listings such as SpamCop typically clear within a day of complaints stopping.
Whatever the outcome, treat the report as a snapshot rather than a verdict. Lists re-evaluate constantly, so teams that manage mail infrastructure check on a schedule instead of waiting for the next incident to force their hand.
Troubleshooting Common Issues
A few situations trip people up repeatedly.
The check is clean but mail still bounces. Gmail, Outlook, and other large providers run private internal blocklists that no public checker can see. Query their postmaster tools directly, such as Google Postmaster Tools or Microsoft's SNDS.
You get relisted right after removal. The root cause is still live. Go back to Step 4 and dig deeper into outbound traffic.
Two tools disagree. Checkers query different list sets, and some cache results. Compare timestamps before assuming either one is broken.
You're on shared hosting and keep getting flagged. Ask your provider for a dedicated IP. Bad neighbor syndrome on shared ranges is one of the hardest patterns to escape.
Why I Never Trust a Single-List Result
Years ago I inherited a client whose transactional mail had been quietly degrading for weeks. The first checker I ran came back spotless. A second tool, querying a wider set of lists, surfaced a Spamhaus listing that explained every bounced message that month. The first checker simply didn't include the right database.
That afternoon changed how I read these results. Coverage varies more between tools than most people expect, so I treat any single clean report as provisional until a second source agrees. Thirty extra seconds has caught more than one false negative since.
The slower lesson was about delisting itself. Getting removed is easy. Staying removed is the work. Every repeat listing I've investigated traced back to a root cause someone patched over instead of fixing, usually an open relay, a weak credential, or an unpatched device nobody remembered owning. Run the check by all means. Just budget most of your energy for what the check uncovers, because that's where the outcome gets decided.
Dig Trace
Dig Trace exists for exactly this kind of investigation. The platform bundles more than 15 free network diagnostic tools, including the IP blacklist checker featured above, alongside IP lookup, port scanning, SSL verification, and VPN detection, so you can trace a listing back to its cause without hopping between five different websites. Everything runs in the browser with no account required, and the tools are available in several languages, including Spanish and French. When you're ready to look deeper at your exposure, the port scanner and IP reputation tools are the logical next stops.
Recommended Reads
IP Blacklist Checker, the free multi-list tool used throughout this guide
IP Checker, for finding your public IP and geolocation before you scan
Verificador de IP em Blacklist, the same blacklist checker in Portuguese